The road to becoming the local grill jockey God always starts with cooking in direct heat and cremating everything you attempt to cook. For those of you with a working brain cell or two it doesn’t take long for you to work out that you need to move the coals about to create two different heat zones. This massive breakthrough will serve you well for the vast majority of grilling sessions. In fact, for the vast majority of people, this small evolution in grilling style is as far as their learning curve will take them yet they will still have learned to produce fantastic BBQ food. But if you’re wanting some of the BBQ classics such as pulled pork, brisket or ribs you’re going to need to learn to cook low and slow. This is where knowledge of the snake method will elevate you to the deserved position of grill jockey God.
What is the snake method and why use it?
Firstly, the snake method is called several different names. I first knew it as the fuse method, but recently this style of cooking has gone mainstream with backyard pitmasters and the chosen name that has stuck is the snake method. You might also hear it referred to as the C or U methods (as this is what it looks like).
The snake method is a way of setting up charcoal briquettes (shown below) to achieve a long cook at low indirect temperatures (grilling in direct heat is when you place food directly over the coals, indirect is when you use the radiant heat produced by the coals – placing your food off to the side of the charcoal).
The main reason to use the snake method is to grill certain big cuts of meat at a low temperature over a longer time. You don’t want the classic amateur cook mistake of cooked meat on the outside and raw, inedible meat in the middle. At the same time, you don’t want to use a snake when grilling a fillet steak or thin cuts of meat.
You can also use your snake, and this is what most people do and is what I’ll demonstrate below, to turn your standard grill into a smoker. All you need to do is add some wood chunks or chips on top of the charcoal, be it cherry oak, apple, or pecan to bring a lovely smoky flavor to your meal.
Setting up the snake for grilling
I’m going to demonstrate the snake method using a Weber kettle grill (Master Touch), Weber briquettes and wood chips. No, I’m not sponsored by Weber but these seem to be the most popular bits of equipment used today, so demonstrating using them is likely to be of the most help.

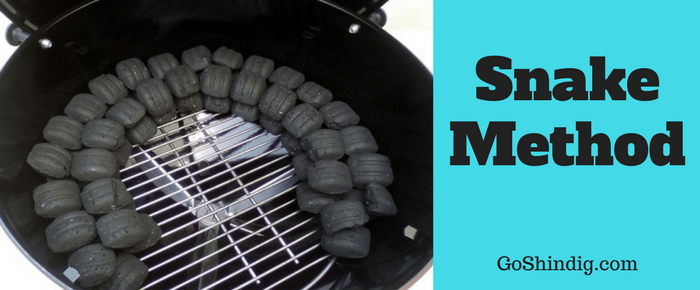
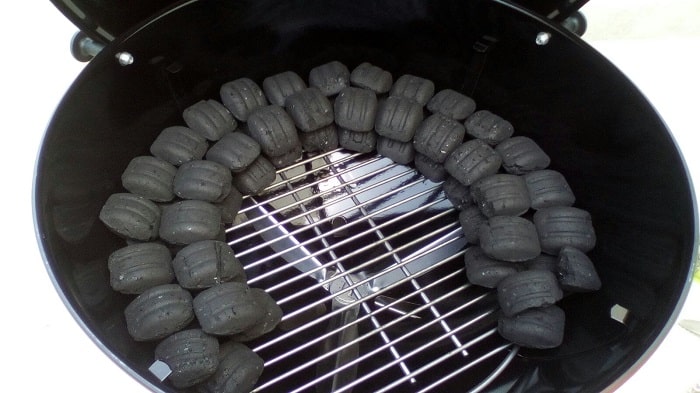
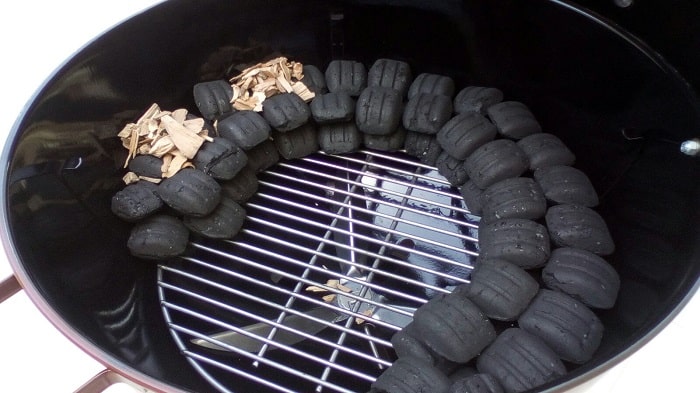
Bottom row of briquettes – Place a row of briquettes around the outer edge of your lower grill (the charcoal grill). Make this row two briquettes wide. The standard question you get when explaining this grilling tactic to someone for the first time is “how long should I make this row?”, and it’s the obvious question to ask.
My answer is you’ll never be 100% sure how long it should be. It depends on the quality of the briquettes, the amount of moisture in the meat, the weather outside, how much wood you use, etc. So it’s best to make it longer than you think you’ll need.
When you first attempt the snake method I’d recommend running it ¾ of the way around your grill. And although some people worry about wasting briquettes, this is not a problem. The snake method is the most economical system for using briquettes – you get every last ounce of heat out of them. And as the heat runs around the snake very slowly, once your temperature probe tells you your meat is cooked, any unlit briquettes can be saved for later use.
Make sure each of the briquettes are pushed up on each other. The idea is the heat passes along like a fuse and therefore have to be in contact with each other. If your food doesn’t reach the required temps by the end of the snake you’ll have to open the lid, take the top grill off with meat, and then add some extra briquettes to the end of the snake – use tongs and heatproof gloves.
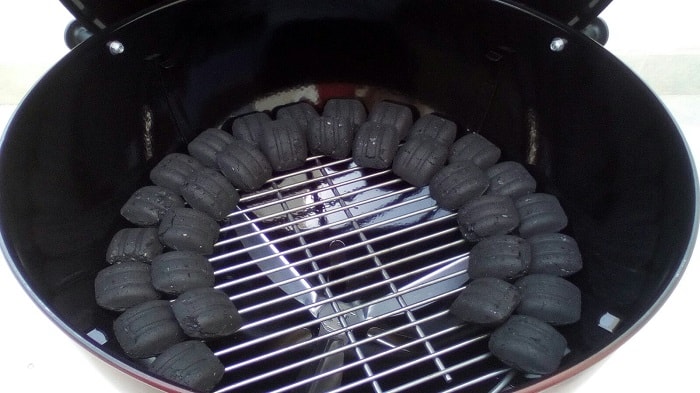
Second row of briquettes – Remember this is grilling! There are very few hard and fast rules so experiment and have fun. For the second row of briquettes some people like to have a single row (a 2 by 1 snake) and others add a two briquette thick row (a 2 by 2 snake). Neither’s right nor wrong, just what you prefer for the meat you are cooking/smoking.
Generally I use the 2 by 2 snake. People new to BBQ grilling expect this to mean you’ll make the grill hotter using this system. But this isn’t the case, it just means you’ll limit the airflow a little more by closing the air vents a little (never completely close the vents). The 2 by 2 also means you can get a longer cook time. Remember there are no rules and you can change the snake to however you like.

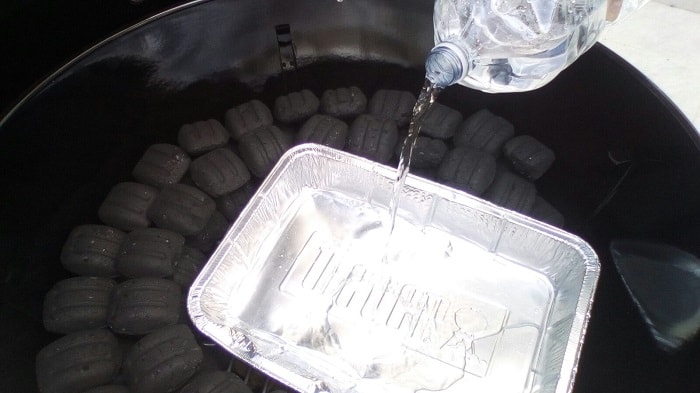
Tray of water – In the center of the charcoal grill place a tray of water. The purpose of this is to help keep temperatures stable. It doesn’t have to be a water tray, I have seen people use sand or a brick, both do the same job. I just prefer a tray of water as it gives the juices a place to drip that is then easy to clean up afterward.
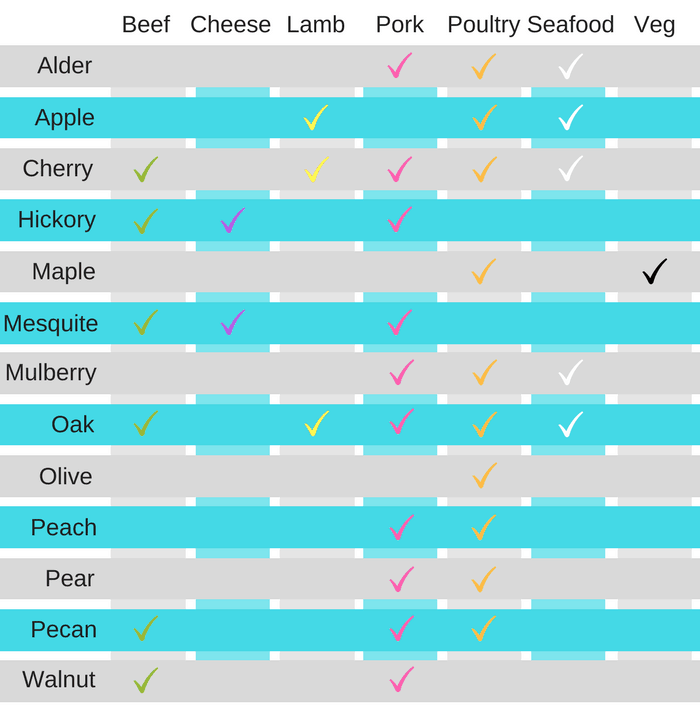
Wood for smoking – You can use chunks of wood or wood chips for this. The type of wood is normally dependent on the meat you are grilling. Here is a good meat to wood pairing chart
Once you have chosen your wood, you’ll have to add it to the coals. It’s been agreed that meat takes on most of the smoky flavour at the start of a cook, so it’s best to place your wood at the start of the snake. If using wood chips it’s best to place these in little piles nicely separated from each other.
Wood burns faster than briquettes, so if you place the wood in a single row across the briquettes all touching each other then they are likely to set off a chain reaction and light up the briquettes when not needed.
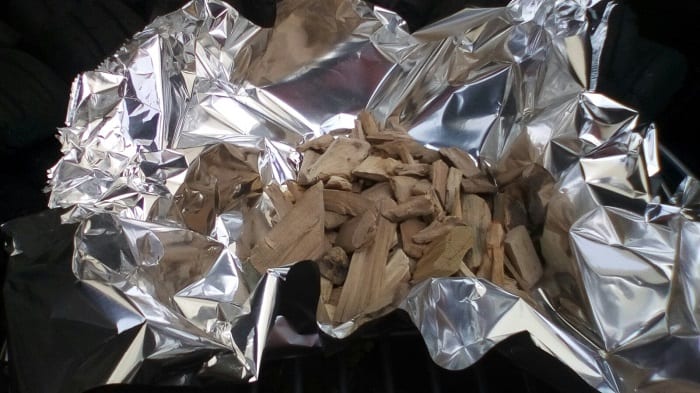
Until recently, many people would soak their wood in water before adding them to the coals. But thankfully, due to an experiment by BBQ hall of famer Meathead, we now know that is no need to soak wood before grilling.
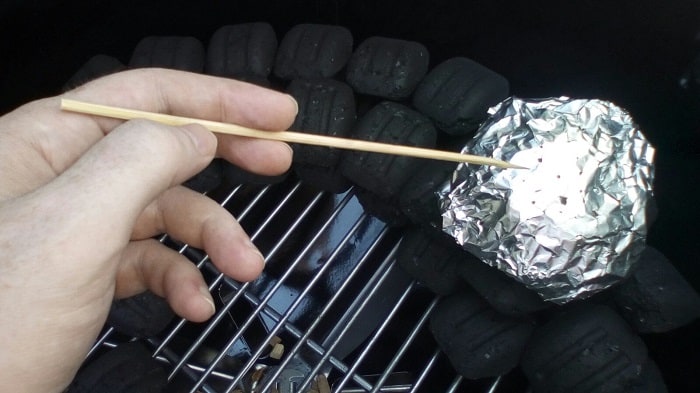
One tactic you might want to use if you think your wood chips are burning off too quick to give the food a nice smoky flavor is to either use a smoking tin (many people make their own by punching holes in old Tabacco tin) or another tactic is to wrap a bundle of chips in tinfoil and then punch some holes in them.
Light it up – Now it’s time to add hot briquettes to the start of the snake. There are many different methods for BBQ fire lighting that we have already covered in a previous article. Any of these will be good but my preferred method is to use a charcoal chimney to get about eight briquettes to turn grey. Then tip these out at the start of the snake and use tongs for better positioning.
Temp and meat – Now close the lid and wait until the temperature gauge reads 250 degrees Fahrenheit. If you are struggling to reach this temp then it’s likely your air vents need opening a bit more. I’d recommend starting out with the bottom air vent fully open and the top vent half open.
Now place the meat in the center of the top grill. Remember, we are looking to do low and slow indirect grilling, so make sure none of the meat is above the briquettes.
| Some more great charcoal guides |
|---|
| Best Charcoal Grills |
| Charcoal Storage |
| Does Charcoal Go Bad |
| Charcoal Chimney Starter |
| Charcoal Vs Gas |
I’ll be doing 15# of pulled pork soon, and want to use the snake method. One question: The lid is always closed, and you’re constantly igniting fresh briquettes. That means all the coal dust smoke and other added ingredients, is penetrating your food on a long term basis. Doesn’t seem like a good idea to me. What are your thoughts? Excellent site, BTW!
Cheers.
Great Question! Use briquettes that are nothing but wood, no binding materials, just burned wood ground up and compressed into briquettes. No coal or petro chemicals. No starter fluid. Use smoking wood that has not ever been sprayed if at all possible. If you get pruned branches from a commercial orchard, ask if the orchard has ever been sprayed with pesticides, insecticides etc.
Hi Dane, Sorry for the late reply. And thanks to Doc for a great answer that basically said everything that needed to be said.
I’d recommend reading our article on briquettes. It covers subjects such as binders, accelerants, colorants, fillers, and release agents. Along with recommending a couple of the better commercial briquettes.
If you’re still not convinced you can use lump charcoal for the snake method also.
Brian –
So if you use hardwood briquettes – will you see an increase in temp? longer burn times?
How does a 2×2 make for a longer cook time? Are you saying that you need to adjust the air vents for the 2×2 to not be hotter than a 2×1?
Thanks!
I used a 2×2 snake so smoke a pork butt. I was struggling to keep the temp above 200f. The vents were all open. Any suggestions?
I made our first pork butt a couple weeks ago on a 22” weber kettle using the 2×2 method. Was able to maintain 220 – 245* for 8.5 hrs+. WAS TO DIE FOR. If your top and bottom vents were fully open, you ‘may’ have had the coals too tightly overlapping. Always start with adjusting the top vent, then adjust/shut down the bottom vent and adjust from there .. top-bottom.