Dutch ovens, although having been around for nigh on centuries, are being seen by many as the future of outdoor cooking. It may seem strange to read that as cooking with Dutch ovens is hardly a new sight to behold across camp sites nationwide, but as our understanding of this multifunctional piece of equipment grows, our capabilities and ambitions are pushing ever greater boundaries.
Contents
What is a Dutch Oven?
Let’s start with the briefest of brief histories. Although the story is interesting to some, it might not be for others and ultimately, the humble beginnings of the Dutch pot should have no bearing on your decision of which one is best for you.
Dutch ovens have been around in some form or other going back centuries. References to early cooking pots which spawned the modern day ovens can be found in the Old Testament.
Fast forward to the start of the eighteenth century and the Dutch came up with a new way of casting molds for the pots which produced smoother surfaces and all round better quality pots. They discovered that if they used dry sand molds they would last longer than the single casting that was possible by using loam or clay soil.
An English gentleman named Abraham Darby saw the genius in this and over time came up with a similar casting process which he patented and he ended up distributing cast-metal cooking devices all round Britain and the American colonies, hence the name Dutch ovens.
So what is a Dutch oven? In its most basic form, a Dutch oven is a cooking pot. There are a few varieties which we will touch on just below but in the main part, a Dutch oven will be a heavy cooking pot with relatively thick walls and a tight fitting lid.
Types of Dutch Oven
There are two basic types of Dutch oven – the camping Dutch oven and the domestic or kitchen Dutch oven.
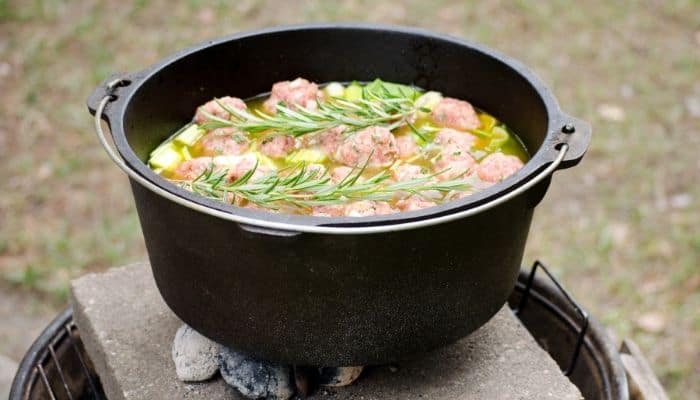
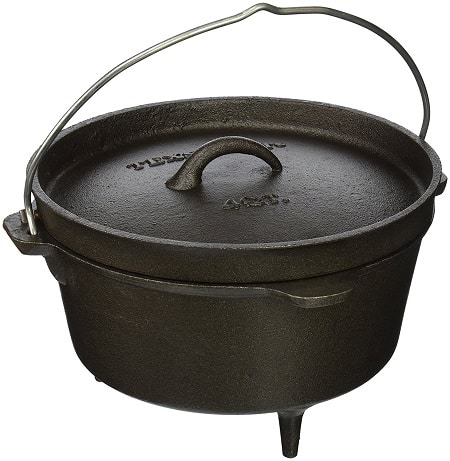
Camping Dutch Oven – This is the kind of Dutch oven we at GoShindig love. Made for outdoor cooking, the camping Dutch oven is noted for its three short legs on its base which are used so that the Dutch oven itself can sit above charcoal that is used as its heat source. The camping Dutch oven is also distinguishable by the lip or ridge that you will find on its outer edge. The function of this is to set bricks of charcoal on the lid without them falling off so as to provide a more uniformed source of heat for particular cooking styles.
Kitchen Dutch Oven – Kitchen Dutch ovens can be used in conjunction with your home cooking appliance. They can be used either on worktop burners or hot plates or can be used in the traditional oven. There is no need for legs on kitchen Dutch ovens so you will instantly be able to tell them apart from the camping variety. Also notable is that the lid will be domed as there is no need for coals to be placed on it which also negates the need for the lip.
Materials used in Dutch Ovens
There are three different main types of Dutch ovens that you can buy and understanding the differences between each of them is essential to providing yourself with the best Dutch oven to suit your particular needs.
Cast Iron – Cast iron Dutch ovens are great for using outdoors. They are a must if you are serious about having some delicious camping food. If seasoned (we will cover this shortly) and looked after correctly, cast iron Dutch ovens will last you a lifetime. They come into their own in outdoor environments as they hold and distribute temperature extremely efficiently. This ensures a nice even cook for your meal. If exposed to open air and high winds then these ovens will not be greatly affected. Cast iron Dutch ovens will withstand temperatures up to 2000 degrees Fahrenheit which is more than plenty to cope with open fires or burning coals.
They are not perfect however. Cast iron Dutch ovens are slow to react to temperature changes. Whilst this does give an evenly distributed cook, it may also involve you waiting longer than other ovens to achieve your desired temperature. If cast iron Dutch ovens are not seasoned or looked after properly then they are liable to rust or lose their non-stick properties. With this in mind, you should not use acidic food items in your oven unless you are sure it is properly seasoned. You should also only clean them with water and not soaps or detergents. Cast iron Dutch ovens can also be very heavy so be sure you take this into account if backpacking with one of these things.
Aluminum – Aluminum Dutch ovens or Dutch pots as they are also known as are mainly thought of as lightweight cast iron ovens. They provide the same basic functions but with a few differences – some good and some bad.
Obviously, one of the good points is that they are a lot lighter than their cast iron counterpart which makes them a lot easier to carry. Because the metal is a lot lighter, aluminum Dutch pots gain and lose temperature much more rapidly which is great if you are ever in need of a quick-fix meal. Cleaning is perhaps a bit more conventional as you are able to use mild soaps which will not affect the performance of the aluminum Dutch pot.
Now for the not so good. Aluminum is a less durable metal so the life expectancy will be nowhere near the cast iron alternative. Also, whilst the speed of temperature is faster on aluminum Dutch ovens, this may mean that the cooking process is not as even as the cast iron. There are dangers that there will be hotspots on your pot which can lead to uneven cooking or even burnt food. Windy weather will add to this as the heat will be distributed and absorbed by the pot in a less uniform manner. Aluminum will also only withstand temperatures up to 1200 degrees which makes it susceptible to melting on campfires in extreme situations.
Enameled Cast Iron – Enameled cast iron Dutch ovens can be thought of as the Rolls Royce of all Dutch ovens, and they have a price tag to match. They are pretty much exclusively domestic or kitchen Dutch ovens that are hugely versatile and will give you years and years of service. The one massive benefit of owning an enameled cast iron Dutch oven is that they don’t need to be seasoned. Due to this, you can put any food in this Dutch oven and be safe in the knowledge that it will not deteriorate. This means tomatoes, vinegar, wines etcetera can be used straight away. Although not 100% non-stick, enameled cast iron Dutch oven do have immense non-stick properties.
Apart from the cost of these Dutch ovens there are a couple of things you would want to be aware of before purchasing one. Although they are perfectly fine for the vast majority of household recipes, enameled cast iron Dutch ovens won’t stand up to extreme heat as well as the bare cast iron ones will. If exposed to extreme heat then the enamel has been known to crack. Also, even though they are heavy duty pieces of equipment, they are susceptible to chips or breakages if dropped.
Best Dutch Ovens for Outdoor Cooking
Whilst there are many benefits of home cooking with Dutch pots as evidenced by some amazing Le Creuset reviews, that’s not what we’re really about at GoShindig. We’re massive fans of getting into the open air and living a more al fresco lifestyle.
With that in mind, we would like to show you some of the best options available to you for your outdoor Dutch cooking experiences. I will try to keep everything to around the 5 or 6 quart range as I believe it will be the most popular sizing for you, our readers. Bigger sizes are generally always available. We shall discuss sizing a little later.
Lodge L10DCO3
Quite simply, Lodge are the makers of the best cast iron Dutch oven, period. Check out any video associated with camping Dutch ovens, or to that mind any blog and you will inevitably see that a Lodge is being used.
There are reasons for this, chief among them being that Lodge are a US company that makes sure all manufacturing is done at home. Based out of Tennessee and producing cast iron cookware since 1896, Lodge have been a model of consistency throughout the years using the best raw materials and making sure each piece is pre seasoned.
The Lodge L10DCO3 is a 5 quart cast iron deep camp Dutch oven that has a 10in diameter and a depth of 5in. The legs are big enough so it can sit above coals but not so big as to not retain any of the heat. It features loop handles which make it easy to handle and the lid can be inverted to be used as a griddle. It’s touches like this that makes sure Lodge is at the top of their field, heck they even throw in a Dutch oven cookbook.
GSI Outdoor Hard Anodized Dutch Oven
GSI have made a rather unique and yet a rather splendid camping Dutch oven. They decided to make their product from hard anodized aluminum which means that it achieves a weight of 3lb 10oz which is roughly a third of the weight of a comparable cast iron Dutch oven. Coming hard on the heels of the list of benefits is that as this is an aluminum product it means that there is no seasoning to worry about. This means less time maintaining your Dutch oven and more time spent doing better things like crafting knives and coloring in and er….
The cons of this oven are minimal but fairly important. If you are buying the 10in version of this Dutch pot then it will not come with legs whereas the 12 and 14in versions will. This will require you to buy a stand for the 10in version. This is not that big a deal but something worth bearing in mind if space is at a premium.
Texsport Cast Iron Dutch Oven
This Dutch oven by Texsport is priced at a point that suggests it’s an entry level product, which it essentially is, but do not let that sway you away from the quality it possesses. Even though it has a diameter of 10in it only weighs in with a 4 quart capacity. This is still plenty to feed four or five people but it does make this Dutch pot a little shallower than its competitors.
However, this has proved a very popular Dutch oven and sales have been great. Reviews suggest that on the whole, customers are very satisfied with their purchase and often describe it as an absolute bargain. If you are just starting out on your Dutch oven journey then this might be the ideal way to test the waters and see if it really is for you.
Winterial Cast Iron Camping Dutch Oven
This oven by Winterial is a 12in, 6 quart Dutch oven that features a heavy grade handle which can be used to suspend it over campfires. It comes with the same function as the Lodge whereby you can invert the lid and use it as a griddle.
It is a heavy pot, weighing in at just over 18lbs so it’s not something you would necessarily want to take on a backpacking excursion but for the job it’s intended for it certainly holds its own amongst its peers.
How to Season a Dutch Oven
We have seen seasoning your Dutch oven crop up a few times already in this article and for beginners and novices this might seem a bit confusing. So what is seasoning, why is it so important and how do we do it? Well, never let it be said that I’m not here to help!
Seasoning is the process of maintaining optimal cooking conditions in your Dutch oven by strengthening the coating and keeping a beautiful patina with the use of oils. By doing this you can maintain a good, non-stick surface, stop any bits of Iron from getting into your food and prevent against any natural deterioration by way of rust or corrosion.
Seasoning is fairly straightforward and once you have done it, you will easily remember the next time how to do it. On the very first occasion that you season your Dutch oven, which will be straight out of the box, you should be aware that just like any non-stick kitchen equipment you buy, you are advised to give it a pre-wash with hot soapy water. Do not ignore this as this helps rid the Dutch oven of the protective wax that the manufacturer uses to maintain the integrity of the product. Once this is done and the pot is bone dry we can commence with seasoning.
- Preheat your kitchen oven to 425 degrees
- Place the Dutch oven in the preheated oven for 20 seconds or so just so it’s warm to the touch.
- Choose your preferred oil. Most oils will do such as olive, vegetable, vegetable shortening, just make sure it has a high smoke point. Do not use butter!
- Rub your oil all over the Dutch oven. I use my hands to do this so gloves might be an idea. You could also use rags or paper towels.
- Put your Dutch oven upside down in the oven for an hour or until all smoking has stopped. The lid can be placed on a higher rack. Be sure to have a lined cookie tray underneath to catch the excess oil.
- Take the Dutch oven out and leave to cool until it’s safe to touch. This should be around 20 minutes.
- Repeat this process at least 3 times and preferably until the Dutch oven has a deep, dark, almost shiny color to it. There should be no stickiness to the touch, if there is then repeat the process with less oil at stage 4.
This should safely take you through the seasoning process and with this done your Dutch oven should be wholly non-stick and a breeze to wash after every use.
By cooking fatty foods in your Dutch oven you are essentially naturally topping up your seasoning so shallow frying a piece of fish or making lashes of bacon for everyone is genuinely encouraged which is definitely good for me. Conversely, acidic foods will be fine in your Dutch oven but if used regularly they will start to strip away your seasoning so it is always an idea to make mental notes of what is actually going into your pot.
What Size Dutch Oven Should I Buy?
This is a question often asked by prospective buyers. The simple answer is that you should always buy a Dutch oven that best suits your needs. Price is obviously a factor but that is not such an issue when considering camping Dutch ovens – the vast majority can be picked up for under $100.
So the next thing you should probably consider is what you want to cook and how many people you envisage cooking for. Dutch ovens are ideal for cooking stews, soups and casseroles etcetera where shallower dishes shouldn’t be much of a hindrance. For slow cooking big chunks of meat however you should look to invest in a large Dutch oven that has some depth to it.
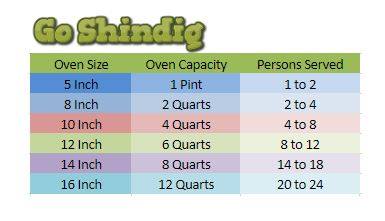
The image below shows rough guestimates of the kind of sizings you can typically expect from your camping Dutch oven and how many mouths you could realistically feed. This is based on standard sized meals, however it should not be taken as gospel as every meal and indeed guest consumption will invariably differ.
What to Look for When Buying a Dutch Oven
There are many things that can detract from the quality of your Dutch oven so knowing what to look for before your purchase can save you a lot of time, money and hassle in the long run.
Lids – Make sure the lids are tight fitting and sit flush on the oven. The huge benefit of owning a Dutch oven is that they distribute and retain heat super efficiently. If the lid has somehow warped or has been cast with structural defects then you will ultimately lose heat, moisture and bags of flavor from your meal of choice.
Walls – Check that there are no dents in the walls on your Dutch oven both inside and out. Also make sure that there is no serious deviation in the thickness of the walls. Both these situations can lead to uneven heat distribution that may cause hotspots. This will lead to all kinds of problems but mainly it may lead to burnt food and debris that is difficult to clean.
Handles – You should make a judgment on whether you will be able to use the handles when the Dutch oven is piping hot and you have to wear oven mitts. Although there are specialized lid lifters there may be times when using them will not be practical.
Weight – Dutch ovens are heavy, like really heavy. If you compare and contrast between similar sized ovens and the one you have been eyeing up seems a lot lighter then it probably indicates that it is an inferior product.
How to Cook With a Cast Iron Dutch Oven
So, you’re the proud new owner of a camping Dutch oven and you’ve taken steps to ensure that it’s properly seasoned, but what now? We could just jump in, guns blazing, and fry up a storm but making sure we have the proper equipment will help us enjoy a much better meal. Below you will find the essential Dutch oven accessories that you will need before you get to start cooking.
Charcoal briquettes – There’s no need to get fancy here. Normal everyday briquettes will suffice.
Charcoal chimney starter – Those coals aren’t going to start themselves. My colleague wrote a great article about fire lighters where he offers various solutions to this step of the process.
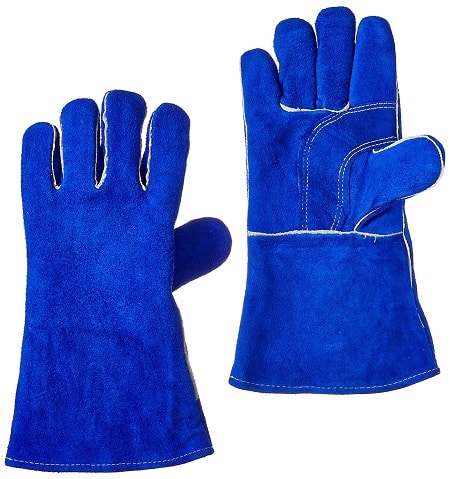
Gloves – Dutch ovens can reach ridiculously high temperatures so a heavy duty pair of gloves is essential. I use welding gloves not too dissimilar to these by US Forge. They protect against any spitting embers and allow you to safely handle the Dutch oven.
Tongs – You will need some long tongs that are able to get you access to the hot coals whilst keeping you as far away from the heat as possible. Lodge make 16in tongs that are designed to do just this.
Lid Lifter – This is a heavy duty tool that allows you to lift the lid from the Dutch oven thanks to a hook on the end. With a Dutch oven lid lifter, you can also move the oven to alternate locations should the need arise.
Stand – Not exactly essential but if you find yourself in wet terrain or even if you just want to cook at a level which isn’t on the ground then a Dutch oven stand could well be your savior. Coals can be placed on the stand and you can set your Dutch oven over the top of them.
Lid stand – A Dutch oven lid stand is unsurprisingly a tool which you use to place your hot lid on. This helps keep the lid clean and out of the dirt whilst it can also be used to shelf the lids that can be used as griddles. Just throw a few hot coals underneath the stand and hey presto.
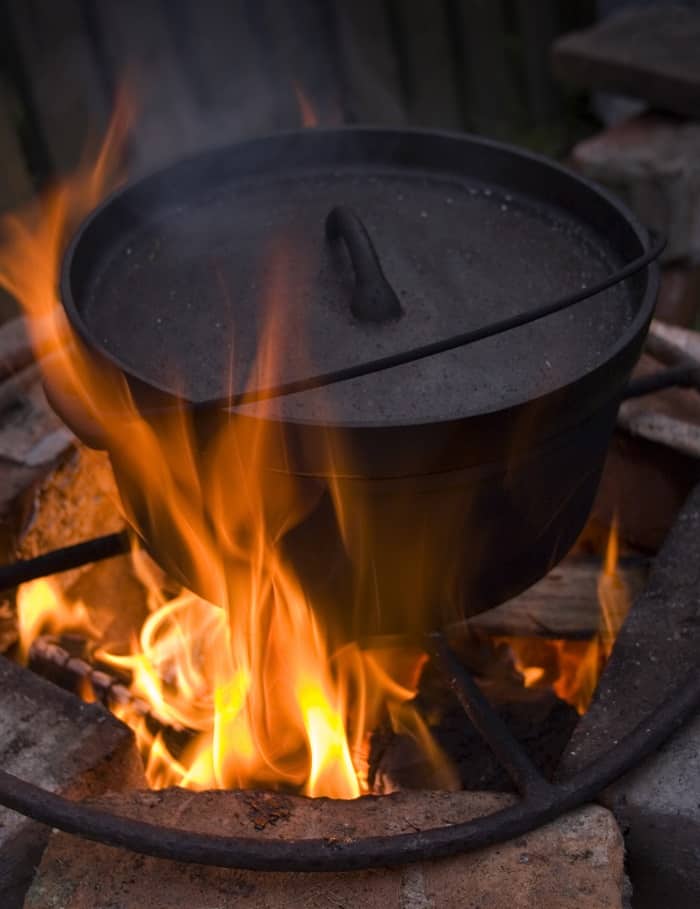
Tripod – If you’re not going the charcoal route then you will need to cook on an open fire and for this you will need a Dutch oven tripod.
Liner – If you really want to protect your seasoning on your oven then you might want to consider this Dutch oven liner. If you’re unsure of the state of your seasoning and you don’t want to take any unnecessary risks when cooking with acidic food then the Dutch oven liners are the perfect solution.
We now have everything we need to get started so the last thing that we really need to know about is achieving correct temperatures. This is essential if working to specific recipes or making sure that your slow cooked Dutch oven chicken won’t dry out unexpectedly because of high heat.
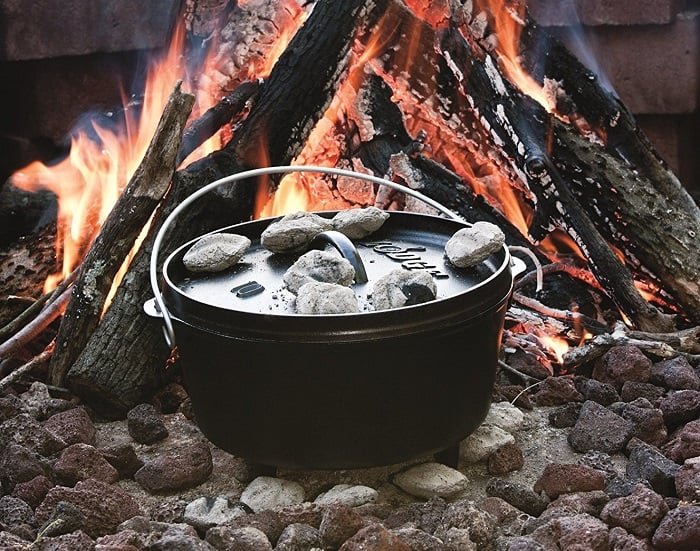
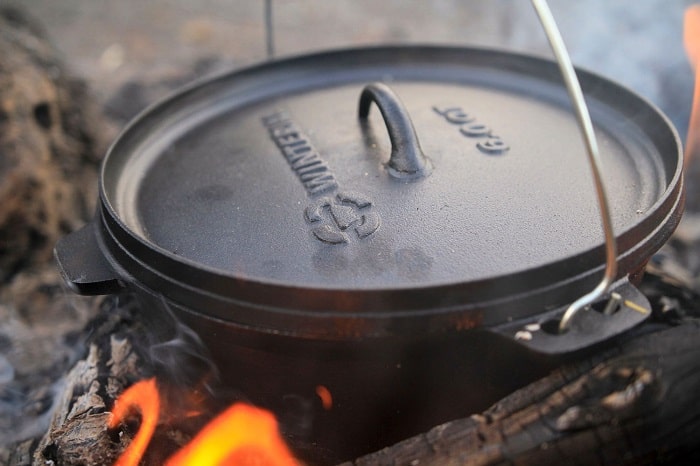
With Dutch ovens you can cook with coals underneath, coals on top (although this is pretty rare), or with coals on the top and bottom
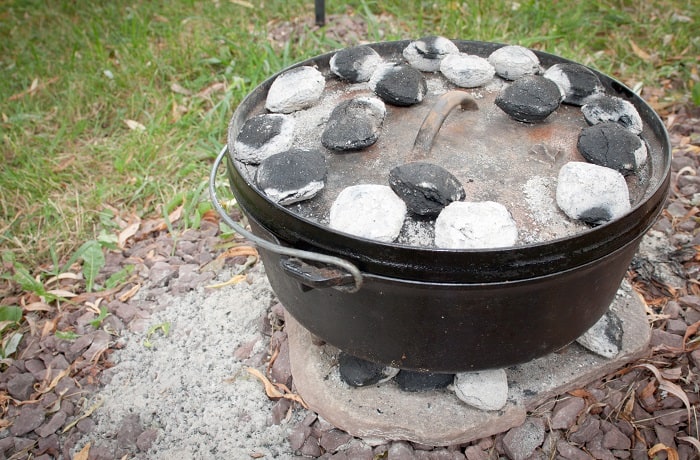
Cooking with coals from the bottom allows you to brown, fry, simmer and boil your food in much the same way a pot or pan used on a stove top will. You should use roughly the same amount of coals as the diameter of your Dutch oven.
Cooking with coals on both the lid of the Dutch oven and underneath it will help you bake and roast foods like you would in a conventional oven. Dutch oven Bread is a thing of particular beauty. You should aim to use roughly double the number of coals that the diameter of your Dutch oven is with a 3 to 1 split in favor of the coals on the lid.
We have created this simple Dutch oven temperature calculator that will let you know temperatures achievable when using certain amounts of coal.
| Some more great outdoor cooking gear |
|---|
| Cast Iron Cookware |
| BBQ Apron |
| Grill Tools Kits |
Dutch Oven Calculator
Oven Size
Oven Size
Oven Size
When arranging your coals, make sure that they are not all congregated in one area. Spread them around evenly either in a circular pattern or a pattern which ensures they are all equidistant from one another. This will promote a more uniform temperature across your Dutch oven which will in turn produce better food.
Be sure to turn your Dutch oven at regular intervals. Even though you may have laid a good formation of coals, there will still be variance in temperatures between individual briquettes. This can be exacerbated if there is a wind that is apparent. By regularly turning your Dutch oven you can eliminate any chance of hot spots forming. One turn every fifteen or twenty minutes should suffice.
Tips
- Always preheat you Dutch oven before cooking.
- Start on low heat and increase the temperature slowly.
- Apply vegetable oil before heating.
- Avoid cold food in hot pans and vice versa to prevent sticking
Cleaning Cast Iron Dutch Ovens
When all is done and dusted, it’s time to face up to the harsh reality that the washing up needs to be done. Thankfully this is not too much of a chore for cast iron Dutch ovens. By seasoning your oven you promote a non-stick surface which should make cleaning a breeze.
Normally a rinse with hot water and a scrub with a good quality nylon brush should do the trick but sometimes you will happen across some food that just won’t budge. In these cases it’s best to boil some water in your pan for a few minutes to loosen the food which can then be brushed away.
When your Dutch oven is cleaned from all foodstuff there are still some measures that you should take to protect it.
- Don’t leave your oven to air dry as this can promote rusting. Always towel dry the oven immediately
- Apply a light coat of oil which will keep you on top of the seasoning.
- Store the oven in a cool dry place (the oven is an ideal spot)
- Allow air to circulate around your oven. If the lid is in place then use a paper towel to create a gap and allow air through to the pot.