There’s a long tradition in backyard BBQ of repurposing parts and tools from other industries for outdoor cooking. These hacks include converting old steel barrels into meat smokers and wiring-up electric temperature controllers for your grill.
I don’t know who first thought to use an industrial infrared thermometer to measure the temperature of their grill grates, but I’d like to meet them and shake their hand. With this simple hack, they solved a major problem for outdoor cooks.
You no longer have to wonder or estimate your grate’s temperature based on time or your grill’s level of flame. Instead, with an IR thermometer or temperature gun, you can measure it accurately, even without making direct contact with the surface of your grill.
Just push a button and the device will tell you the temperature of your grill, smoker or pizza oven. Getting an accurate temperature measurement inside your cooker has never been easier!
Contents
- 1 Our Reviews for the Best Infrared Grill Thermometers
- 2 What is an Infrared Thermometer?
- 3 How a Laser Temperature Gun Works
- 4 Why Trust Us
- 5 What to Look for When Buying an IR Thermometer
- 6 Build Quality
- 7 Top Infrared Thermometers Video
- 8 Why Would You Use an IR Thermometer?
- 9 What are the Drawbacks?
- 10 Final Thoughts
Our Reviews for the Best Infrared Grill Thermometers
A few years ago you didn’t have many options when shopping for an IR thermometer. Most manufacturers focused on designing devices for factories and auto shops instead of the home market.
As they became more popular with chefs, these thermometers picked up the notice of BBQ professionals as well. Nowadays it isn’t hard to find an inexpensive temperature gun that’s perfect for backyard pitmasters and casual chefs.
If you’re looking for a good tool for your BBQ, consider one of the following IR thermometers. These highly-rated devices are generally user-friendly and made by brands well-known in the industry. Even better, they are reasonably priced and easy to use!
Etekcity Lasergrip 630, 1080 and 774
Etekcity has a wide variety of IR thermometers on the market and is definitely one of the top manufacturers. Their line-up offers some of the best value for your money too.
If you’re looking for a cheap and reliable infrared thermometer, these three devices from Etekcity have got you covered.
Premium Etekcity 630 Dual Laser Thermometer
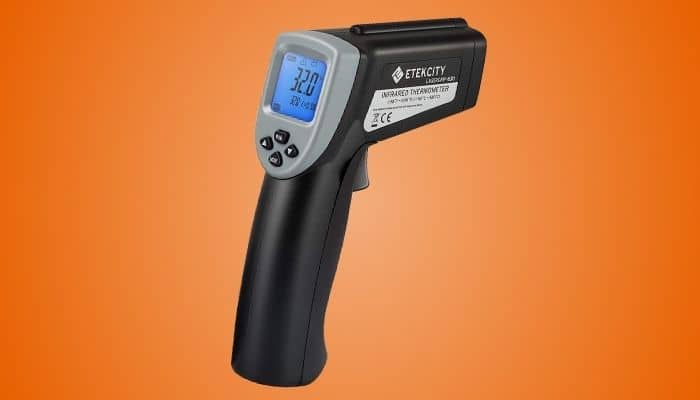
The Etekcity 630 is everything you could want from a temperature gun. It has a solid and sturdy black and grey plastic housing with a molded grip, backlit digital screen and easy to reach rubber buttons. It is also packed with features that are especially useful for BBQ.
The 630 is my favorite thermometer in the Etekcity line-up for a couple of reasons. It is a premium IR thermometer priced in the budget range, so you really can’t find a better infrared option for your money. These features really help it stand out:
- Adjustable emissivity allows you to use this device to easily measure any type of surface. You won’t be locked into a factory preset.
- 16:1 distance to spot ratio.
- Two laser guides make it easy to define the area being measured.
- Custom mode controls allow you to review the minimum and maximum temperatures from your last scan, or to calculate the average or difference in a set of readings.
- Can set custom high/low temperature alerts.
- Measures temperatures ranging from -58°F to 1076°F +/- 2% (-50°C to 580°C +/-2°C).
Budget Etekcity 1080 and 774
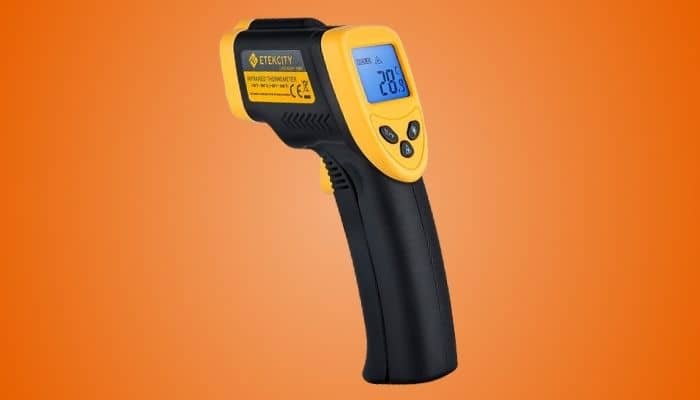
The Etekcity 1080 and 774 are closely-related devices and are typically priced in the same budget range. You’ll often find these thermometers for under $20.
Both models have a black plastic housing with bright yellow accents, backlit digital screens, molded grip, and rubber buttons. In fact, when sitting side-by-side it can be hard to tell these thermometers apart. The features of these thermometers include:
- Fixed emissivity, so you can’t adjust the thermometer for different surfaces.
- Distance to spot ratio of 12:1.
- Single-laser guide.
Where the devices differ from each other is in the range of temperatures they can measure. The 774 can measure temperatures from -58°F to 716°F +/-2% (-50°C to 380°C +/-2°C). The 1080 can go higher, with a range of -58°F to 1022°F +/-2% (-50°C to 550°C +/-2°C).
Any of these models from Etekcity would be a bonus for a backyard pitmaster. If you are only using a temperature gun with your smoker or grill, the 774’s temperature range would be perfect. The distance to spot ratio is big enough to give you plenty of room to get a good measurement inside your cooker.
For higher heat cooking, such as a wood-burning pizza oven, the 1080 and 630 would be a better option since they can measure temps over 1000°F. Given the slight price difference between the devices, I’d take the 630 with its adjustable emissivity and larger distance to spot ratio over the 1080.
Raytemp 8
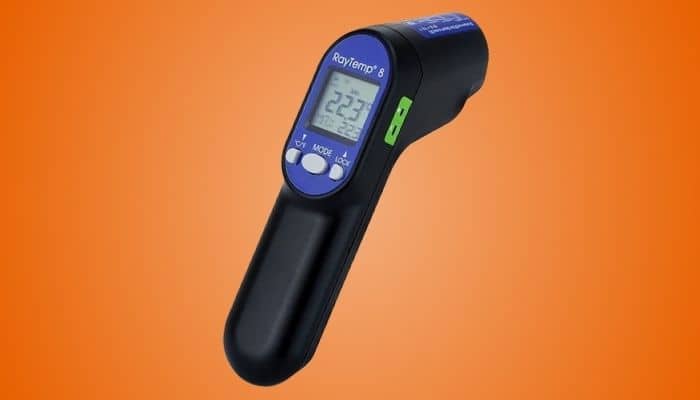
The Raytemp 8 will give you an idea of how an industrial IR thermometer differs from a cheaper home-style unit. The Raytemp is a nice temperature gun with a lot of features. But priced at more than $100 it’s probably overkill for a backyard barbecue thermometer.
The Raytemp 8 is two thermometers in one device. In addition to the infrared thermometer, it also has a socket that accommodates type K thermocouple probes. It even comes with a probe to get you started.
Unfortunately, the thermocouple probe has no relevance for cooking or BBQ, but if you need a laser gun for other purposes this feature could be handy.
The IR gun has a distance to spot ratio 12:1 and a temperature range of -60 to 500°C. Like the Etekcity 630, you can set the mode to view the minimum and maximum temperatures or record the averages or differences between measurements.
The Raytemp 8 comes in a sturdy padded carrying case along with the probe, cleaning wipes and instruction manual. While this would not be my pick for an infrared BBQ thermometer it’s certainly a good choice if you’re using it to take more complex measurements.
Exeblue Infrared Thermometer
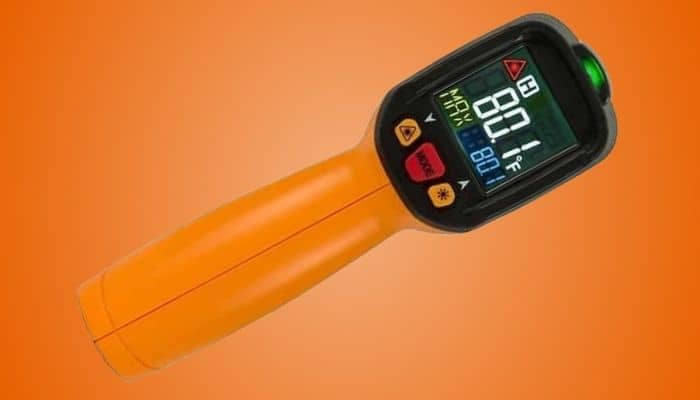
The Exeblue IR thermometer looks a lot like the Etekcity devices, but the manufacturer designed it with cooking in mind. It has a couple of features that really make using an infrared thermometer easier for us layfolk too!
The Exeblue has a bright yellow/orange plastic housing with black accents. The digital screen uses a black background with white and colored numbers, so it is incredibly easy to read. The buttons are clearly marked and easy to tell apart.
Like the Etekcity 630, the Exeblue’s emissivity is adjustable, so you can be sure to get an accurate reading on any surface. You can choose a maximum temperature and the device will alert you when the measurement exceeds your setting. It has a temperature range of -58°F to 1022°F +/-3.5°F and the distance to spot ratio is 12:1.
Where the Exeblue differs from the other devices on my list is in the user-friendly design. The LCD screen allows the data to be displayed in different colors, making it easy to distinguish the readings and alert temperatures. If you exceed your maximum set temperature the numbers turn from blue to red, for instance.
The laser guide is another feature I really love about the Exeblue. Instead of using a single dot or pair of guides, this one uses a 12-point laser guide. You’ll see a circle of dots along with a spread, so you’ll know the exact area you’re measuring. Could a thermometer be any easier to use?
Fluke 62 MAX Plus IR Thermometer
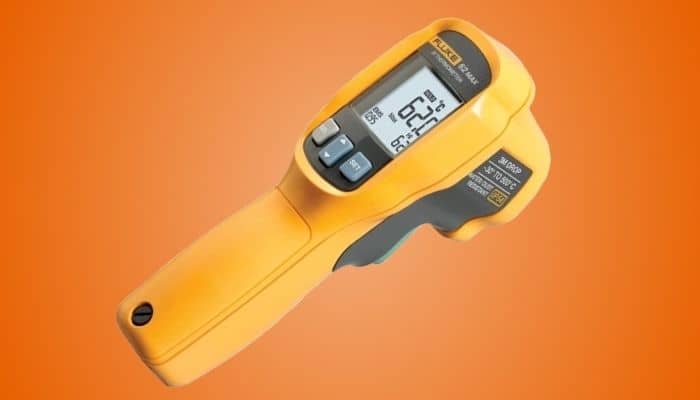
Another industrial-style IR thermometer is the Fluke 62 Max. This is one of the priciest models on my list but is the only one with built-in protection against dust and moisture. If you need a water-resistant infrared thermometer, this might be the best option.
The Fluke is a bit more robust than the other thermometers but is still very lightweight. There is extra protective material around the lens, and the battery door is screwed into place as well. This thermometer is drop-tested up to 3 meters, so it won’t easily break if it slips from your grip.
The temperature range is -22°F to 1202°F +/- 1% (-30 to 650 degrees C +/- 1°C). The Fluke has the smallest error range on my list and offers the most precise measurements. It has a distance to spot ratio of 12:1.
The Fluke doesn’t have a lot of extra features but you can set an alert for a minimum and maximum temperature. The emissivity is adjustable too, which is a nice bonus. It has two rotating laser guides, making it very easy to distinguish the area you are measuring.
This is a solid IR thermometer with a lot of applications for industrial and home use. If you need a thermometer you can use with electrical and mechanical systems, like an HVAC or your vehicles, the Fluke is a great option. But this isn’t the most user-friendly thermometer and is rather pricey if you’re just using it for cooking.
ThermoWorks Industrial IR Gun
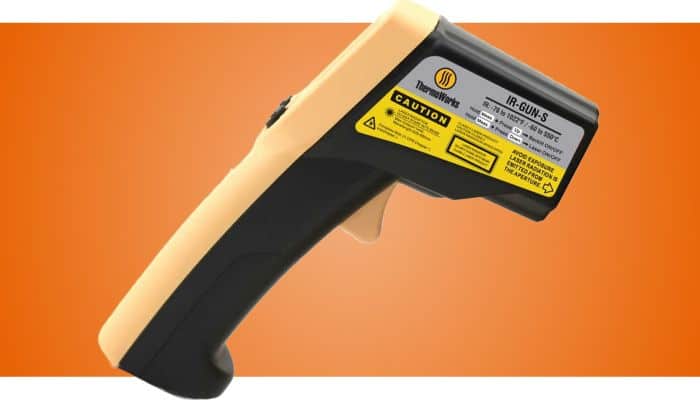
Although it is not quite as durable as other thermometers on this list, the Thermoworks Industrial IR non-contact temperature gun is my top pick for a gun-style infrared thermometer.
If you are 12 inches away from your target, you can measure the temperature of a 1-inch square in less than a second. The Industrial IR Gun has a temperature measuring range of -76 to 1022 degrees Fahrenheit with an error of less than 2 percent, so you can trust its precision.
Since the emissivity may be adjusted, materials with a low emissivity rating, such as anodized aluminum, copper pans, and polished stainless steel, won’t affect the accuracy of your readings.
The “hi-lo” alert that comes standard on the Industrial IR temperature gun will go off if the thermometer detects temperatures that fall too far outside of the range you choose. A large, legible LCD display is also provided.
This thermometer is useful for a wide range of purposes, including ensuring the integrity of your heating, ventilation, air conditioning systems, as well as your home’s insulation and the seal of your offset smoker. And of course, the reason I bought it, to check the temp of my flat top griddle and the temp of my pizza stone.
ThermoWorks Thermapen® IR
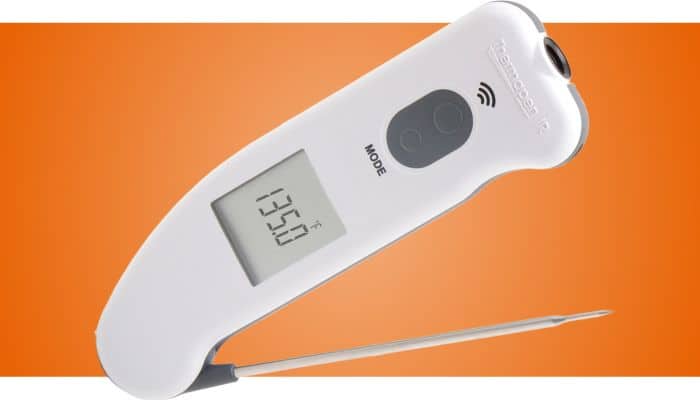
Why spend the money on two separate thermometers when you can get both with the Thermapen IR’s small design?
Thermapen IR is a terrific, adaptable tool in any pitmaster’s toolbox. I’m already a big admirer of the original Thermapen instant-read thermometers before the inclusion of an IR scanner on the other end.
Use the same tool to make sure your grill plate is hot, add your steaks, and check to see that you’re removing them from the heat just as they reach the ideal medium-rare.
The backlit LCD display on the Thermapen IR spins so you can see the readout at all times, and it can be used with either left- or right-handed grips. You may adapt it for any low-emissivity surfaces you might be using thanks to its changeable emissivity settings, which range from 0.1 to 1.0.
Thermapen can provide a surface temperature reading that is accurate to within 0.7°F, so you can count on it as well.
When using the Thermapen, you can focus solely on your cooking thanks to a motion-sensitive sleep feature. When you reach for it, it awakens, and when you put it down again, it goes to sleep. Additionally, it is IP 54 rated, so it won’t be disastrous if you accidentally leave it out in the rain.
Thermapen IR is the ideal thermometer for cooking because to its small size, probe, and IR scanner combo.
What is an Infrared Thermometer?
IR thermometers calculate the surface temperature of an object by measuring the amount of infrared energy radiating from it. All objects radiate some infrared energy. The more energy the device detects, the higher the surface temperature of the object.
If you have ever used one of those kid-friendly ear thermometers then you’ve seen an IR-measuring device in action. They use the temperature of a person’s eardrum to calculate their overall body temperature. You can repurpose an industrial IR thermometer and use it the same way to measure the temperatures inside your grill!
Also referred to as non-contact thermometers or temperature guns, infrared thermometers allow you to accurately measure the temperature on the surface of your grill grates, pizza oven or cast-iron pan.
Many professional chefs use IR thermometers to measure their hot pans or boiling liquids, or for monitoring things like melting chocolate. They are a fast and accurate way to monitor surface temperatures from a distance.
Brief History of Infrared Thermometers
Infrared thermometers have been around in some form or another since WWI but only entered the commercial market in the 1960s.
NASA was actually heavily involved with designing the gun-style readers we use today. Laser guns became an essential tool in factories around the world because they allowed folks to quickly measure temps on things like engines and bearings without stopping the machines or shutting down the factory.
In the 1990’s several companies started advertising affordable IR thermometers for restaurants and home cooks. As the prices came down, backyard pitmasters discovered how useful laser temperature guns could be for outdoor cooking and BBQ.
How a Laser Temperature Gun Works
Unlike traditional thermometers and wireless set-ups, infrared thermometers don’t require direct contact to measure the temperature of an object. You won’t have to mess around with probes or wires or attach anything to the inside of your grill to get a reading.
You just point the device at the surface you want to measure, line-up the laser sight and hit the trigger. Seconds later you have a reading that is accurate and precise to within a few degrees!
Without getting too heavy into the physics behind a temperature gun’s function, they basically work like this:
- You get within range and point the gun at the surface/object you want to measure.
- Line up the laser sight so it circles the area in question (see Distance to Spot ratio and Adjustable Emissivity below for more details).
- Infrared light from the surface/object passes through a lens as it enters the device. This lens focuses the light onto a detector called a thermopile. The thermopile absorbs the IR light (aka radiation) and turns it into heat.
- The heat is then turned into electricity, which is sent to a detector inside the device.
- The detector determines the temperature of the object based on the amount of electricity it produces when the gun is aimed at it. You’ll see the temperature reading on your gun’s digital screen.
| Some more great thermometer guides |
|---|
| Wireless Thermometer |
| Instant Read Thermometer |
| Smoker Thermometer |
| Dual Probe Thermometer |
| Wifi Thermometer |
Why Trust Us
All of our reviews are compiled with a combination of expert input, years of hands-on testing of grilling products, curating the reviews of real-life buyers in a “wisdom of the crowd” system, and of course our own expertise. All the products listed are the ones we would buy if we were looking to purchase a new IR thermometer.
Methodology Used to Pick the Best IR Thermometer
When picking the best IR thermometer we looked at and then rated the thermometers on the following criteria. Price, temp range, adjustable emissivity, distance to spot ratio, build quality, accuracy, and warranty.
What to Look for When Buying an IR Thermometer
Infrared thermometers have come a long way since they were first introduced to the home market. You can now find these devices in a wide range of brands and price points.
The tricky part is identifying the best infrared thermometer for your barbecue or other outdoor cooker. Here are the factors to take into consideration as you shop for your ideal infrared thermometer:
Price
The good news is you can easily find a decent IR thermometer for under $100, and there are many options in the $15-30 range. So a laser gun isn’t going to break the bank and is quite affordable for most households.
There are also a lot of these devices that sell for well over $100. Is a more expensive version better? In this case, not really. If you are only using it for BBQ and indoor cooking, then you probably don’t need to invest a lot of money in buying one.
Since they’ve been designed primarily for industrial use and not cooking, many infrared thermometers have features and settings that a backyard pitmaster has no need for. The less expensive temperature guns work just fine for barbecue and kitchen cooking.
Temperature Range
IR thermometers can detect temperatures over a very wide range, much larger than a traditional thermometer.
Most infrared thermometers can measure temperatures well below freezing, which isn’t terribly helpful for cooking. They can be a great tool for measuring the temperature inside your refrigerator or freezer, however!
You’ll probably be more interested in knowing the upper limits than the lower ones when shopping for your device. A typical inexpensive temperature gun usually has an upper limit of 500-1200°F.
If you’re using an infrared thermometer with your meat smoker, then a device that can measure temps up to 500°F is sufficient. If you do a lot of high-heat searing or cooking in a pizza oven, you’ll probably prefer a temperature gun that can measure temperatures up to 1000°F.
While some devices can measure up to 3000°F, for backyard cooking anything over 1000°F is overkill. You can use an industrial temperature gun for cooking but there’s no reason to spend more money to buy one specifically for BBQ.
Adjustable Emissivity
As you shop for your infrared thermometer you’ll run across the term “emissivity.” Don’t let your eyes glaze over, because emissivity is actually an important factor when using an IR thermometer.
What is Emissivity?
Emissivity is the ratio between the energy radiated from an object’s surface to that of a so-called perfect emitter under identical conditions. When you calculate an object’s emissivity you’ll get a number between 0 and 1. The higher the number, the more energy (aka infrared light) an object can radiate.
Some objects, like mirrors or shiny steel pans, have a low emissivity. Other surfaces, like the skin on your body or black electrical tape, have a high emissivity. This video does a great job of explaining emissivity through the use of an infrared camera.
What does this mean in plain, ordinary English? An object with low emissivity will radiate less heat than one with a higher emissivity even when the object’s surface temperatures are the same.
Adjustable vs Fixed
When buying an infrared thermometer, it is important to know if the emissivity is adjustable or if the device is permanently set (fixed). Otherwise, you’ll have to get a bit creative with how you use your thermometer to measure your grill’s temperature.
Many objects have a lower emissivity than a static IR thermometer is calibrated for. You won’t be able to get an accurate temperature reading on these objects unless you can adjust the thermometer’s emissivity sensor.
This comes into play when cooking because many of the things we use on our stove-tops and grills have a low emissivity rating. Stainless steel or chrome surfaces, especially shiny ones, don’t radiate very much energy. It’s much easier to get an accurate reading if you can adjust the emissivity on your thermometer for the surface you’re measuring.
That doesn’t mean you can’t use a fixed IR thermometer for backyard BBQ. The trick is to use a high emissivity object, such as a cast-iron pan, in place of the low one, like your stainless steel cooking grates.
Tricks for Increasing the Accuracy of an IR Thermometer
Place the cast iron pan in your grill, smoker or pizza oven and wait for it to preheat. Then you can get an accurate reading off the bottom of the pan using your IR thermometer.
Just arrange the pan right over the area you want to measure and the temperature should be the same as the grate underneath it.
Since organic materials have a very high emissivity, you can also coat the surface you’re measuring with a bit of cooking oil to increase its emissivity.
Surfaces that are porous, like enameled cooking grates or the brick inside a wood-burning pizza oven may also skew your infrared readings. Infrared devices are so sensitive they can accidentally measure the temperature underneath the surface through the open pores.
You can use the cast iron pan method mentioned above to accurately measure the temperature of a porous surface, or coat it in cooking oil right before you take a measurement to increase the emissivity.
Distance to Spot Ratio
The most important factor when it comes to the accuracy of your infrared thermometer is its distance to spot ratio. This will tell you how far your thermometer should be from the object it is measuring to give you an accurate temperature reading.
Using math terms, the distance to spot ratio (D:S) is the ratio between the distance (D) you are from the object and the diameter (S) of the area you are measuring. It sounds a little confusing at first but it makes sense once you understand the principle.
The Flashlight Analogy
Think of how light reflects from a flashlight in a dark room. If you aim the beam at the floor right by your feet you’ll see a circle of light that’s just a little bigger than the diameter of your flashlight’s bulb. If you move the light to a wall 10 feet away you’ll see a much wider circle of light even though the flashlight is emitting the same amount of energy.
As your distance (D) from the surface increases, the area covered by your flashlight’s beam (S) gets wider. When you decrease the distance from the surface, the beam gets tighter. That’s distance to spot ratio in a nutshell.
IR thermometers work in a similar way. Thermometers with a larger distance to spot ratio can measure a smaller, narrower surface from a greater distance than those with a smaller ratio. For home use, you’ll want to get a thermometer with a reasonable distance to spot ratio.
Ideal Distance to Spot Ratio
Typical ratios for home IR thermometers include devices rated as 8:1, 12:1 or 16:1. You can find thermometers with much larger distance to spot ratios, but these are mostly for industrial purposes and are quite expensive. You really don’t need that for backyard BBQ.
A thermometer with an 8:1 ratio will allow you to get an accurate reading on a one-inch wide circle from up to 8 inches away. If the spot you want to measure is 2-inches wide the reading will be accurate from up to 16 inches away.
So a 12:1 device can take the reading on an inch-wide circle from 12 inches away and a 16:1 from 16 inches away. As your circle widens your thermometer’s accuracy over distance increases as well.
The ratio works in the other direction as well. If you want to measure an area with a diameter of a half-inch, and your device has a D:S ratio of 8:1, you’ll need to be no further than 4 inches away to get an accurate reading. For a 12:1 device, you’ll have up to 6 inches of leeway.
So an IR thermometer with a distance to spot ratio between 8:1 and 16:1 should give you plenty of room to take a measurement inside a BBQ.
Where the Laser Comes In
When taking a temperature with an IR thermometer, you can always get closer to the object to take a reading, but it doesn’t work in reverse.
If you use a thermometer rated at 8:1 on your grill grates from two feet away you’ll get an averaged temperature that isn’t accurate. The device will be reading the wider area around your grates instead of the grates themselves. The “spot” you are measuring at that distance is everything within a 4-inch circle!
You might think you need a fireproof tape measure to determine how far away you need to be to get a reading on your portable grill or smoker. Nope, that’s where the laser part of the gun comes into play.
The handy laser guide will give you a visible dot or circle to aim at your surface. You’ll easily be able to see the area the device is measuring and make adjustments to get the most accurate reading possible.
Some guns have more than one laser guide or use a full laser circle for increased accuracy. The laser-circle guide is the best option since it shows you the exact area of measurement.
Build Quality
Obviously, a cheaper infrared thermometer is going to be less durable and more likely to break after a few years than an industrial device. But do you need a robust laser temperature gun for home cooking or BBQ?
Honestly, most of the devices sold for the home market are all based on the same design. You have a chunky gun-shaped plastic housing with a lens, a digital screen, and a few buttons. An expensive thermometer may be a little tougher than a cheap one but they both get the job done.
If you’re not using your thermometer in a factory, auto shop or commercial restaurant you probably don’t need to worry much about the build quality.
Lens
The lens on your IR thermometer is what controls its ability to focus the infrared light onto the thermopile. If the lens breaks or gets covered in dirt your temperature gun isn’t going to give you an accurate reading.
Look for a thermometer with a well-protected lens, and be sure to clean your gun’s lens with a soft cloth and some alcohol before and between uses. Store your thermometer in a protected location away from the damp, dirt and dust and don’t leave it outside all winter.
Speed and Accuracy
Every IR thermometer is going to have different specs and you should read the fine print so you know what your device can and can’t do.
Most home units only take a few seconds to take a measurement. It is often best to take several measurements back-to-back to be sure you’re getting a good reading. This should only take about 30 seconds at most to do.
Each infrared thermometer comes with a temperature range and a number indicating its range of error. The error range will tell you how precise the unit’s measurement is within a prescribed number of degrees.
How Precise is the Thermometer?
For example, a common temperature range for an IR thermometer is -58°F to 1200°F +/- 4°F. The last part indicates that the thermometer is accurate to within 4 degrees above or below the displayed temperature.
The easiest way to picture the error range of a thermometer is to double the +/- number. That will tell you the spread and give you an idea of the thermometer’s precision. For the example above, the thermometer’s spread is 8 degrees.
So this thermometer will display a temperature that’s within 8 degrees of the true temperature. If the display reads 152°F on the digital screen, it really means the temperature of your surface is between 148-156°F.
Every thermometer has an error range, even traditional and insta-read versions. If you want the most precise and accurate thermometer, look for one with the narrowest error range you can find.
Warranty
Warranties are an important consideration when you’re buying an expensive piece of equipment for your backyard kitchen.
If you’re shopping for a pellet smoker or premium charcoal grill, or for an accessory device like a rotisserie unit, then the warranty matters.
I don’t really worry about the warranty when shopping for an IR thermometer. If I were investing hundreds of dollars into the device I would, but I’m usually not going to send a $15 unit back for repairs. It’s easier and cheaper to just buy a new one.
If you’re a big warranty person you can certainly look for a thermometer with great multi-year coverage. But it’s usually not worth dealing with the warranty on something under $100.
Top Infrared Thermometers Video
Why Would You Use an IR Thermometer?
You should have an IR thermometer for your grill, smoker or pizza oven because it is the fastest and most accurate way to measure the temperature of the surfaces inside. As a bonus, you can always use it in the kitchen to measure the temperature of your pots, pans, and oven!
Standard oven thermometers can give you an estimate of the air temperature inside your grill but don’t actually measure the temperature of the grates themselves. In a grill set for 2-Zone cooking, for instance, an oven thermometer isn’t going to be able to measure the temperature difference between the hot “direct” side and the cooler “indirect” one.
Even the probe-style thermometers you can place inside your grill only measure the air temperature and not the temperature of your surfaces. So how do you truly know when your grill is hot? This may not matter much when cooking up some veggies but is a critical factor when getting the perfect sear on a steak or chicken breast!
I know, a million websites state that you don’t need to measure this internal temp and can just “guesstimate” it with your hand. These sites make the claim that if you can hold your hand over the grate for 5-6 seconds then your grill is about 250°F. If you can only hold it there for a second then it must be 450-500°F.
But there are some real problems with this hand-guesstimation method:
- The estimate is based entirely on your hand’s ability to tolerate heat and/or pain. This will vary considerably from person to person and in no way produces an accurate measure of the temperature of your cooker’s surfaces.
- This method still relies on “measuring” the temperature of the air right over your grates and not the temp of the grates themselves.
- The temperature you feel with your hand will vary depending on the conditions around your cooker. If it is very humid outside, your grill’s temperature will feel hotter simply because of the extra moisture in the air.
- If you make a mistake you could easily end up burning yourself or catching your clothing on fire.
- No one claims this method is viable for estimating temperatures higher than 500°F, so it’s completely useless for a high-temp set-up. If you want to know the temperature of your wood-fired pizza oven you’ll need to use an infrared thermometer.
Don’t even get me started on the accuracy of the built-in thermometers on most grills and smokers. You may as well break out the tarot cards to tell you when your grill is ready if you trust the reading on an integrated lid thermometer.
Benefits of an IR Thermometer for BBQ
- Allows you to take precise and accurate measurements of the surfaces inside your grill, smoker or pizza oven.
- Instantly gives you a reading, and multiple readings can be taken in a few seconds.
- No contact required! No probes or wires to fuss with!
- Can be used to measure narrow areas like grill grates or wider areas like the bottom of your cast iron pan.
- You’ll look really cool when you wield a laser gun as you grill!
Of course, you can use your infrared thermometer to measure other things as well. They are a great way to monitor temperatures on your stovetop or in your oven or toaster oven too.
I use mine to keep an eye on my portable chest freezer’s temperature when we are traveling or camping.
For fast and accurate surface readings on everything from your grill to your refrigerator, an IR thermometer is the best option.
What are the Drawbacks?
That said, infrared thermometers do have a few drawbacks.
The biggest is that IR thermometers can only measure surface temperatures and not the internal temperature of an object. They can tell you when your grill is ready to sear your steak, but they can’t tell you when your steak hits 140°F.
So an infrared device won’t replace your conventional meat thermometer. You’ll still have to use a handheld digital device to measure your meat’s internal temperatures. But for measuring surface temperatures, an infrared device is still the best option.
They also can’t take a reading through a pane of glass or plastic window. If you don’t open your oven or toaster oven you’ll end up measuring the temperature of the glass window instead of the inside of your cooker.
While you can use an IR thermometer to get a reading on hot oil, boiling liquids are more challenging. The steam coming off can obscure the reading and even fog up the lens on your device.
If you take a reading on a pot of boiling water, you’ll likely just measure the temperature of the bottom of the pan instead of the liquid. Thicker soups and stews and things like melting chocolate or a sauce are no problem to measure with an IR device.
The other downside to these thermometers is that they are only accurate when used as directed. If you’re even a few inches beyond the ideal distance to spot ratio or are using it on a low emissivity object like a stainless steel pan you’re not going to get an accurate temperature unless you make other adjustments.
When used correctly, however, these tools can help you perfect and refine your grilling and meat smoking. It may not be the first accessory you buy for your backyard kitchen, but IR thermometers are definitely worth having around!
Final Thoughts
I strongly advise looking at the choices above if you’re looking for a high-quality infrared thermometer. The models mentioned above undoubtedly meet the criteria for the best infrared thermometers for cooking, which are those that provide simplicity and accuracy. So why are you still waiting?
An infrared thermometer is a great tool whether you enjoy making pizza, enjoy cooking on a flat-top griddle, want to check your grill for hotspots, or just want to make cooking more precise and simple. I hope you were able to find the best infrared thermometer for grilling with the aid of my buying guide. We know you won’t be let down, so be sure to check out my other grill thermometer guides as well.
Do you believe we missed any infrared thermometers from our list? Do you believe that using an infrared thermometer has made your cooking more effective? Please let me know in the comments section below.